Skype for Business is an interoffice/intranet instant communication application that offers audio and video messaging services, which can replace other business tools like telephone, meeting and chat software. Skype integrates with your calendar and provides information about your presence.
Follow these instructions if you are installing Skype for Desktop to a local computer.
(Steps 1 – 5)
Note for Mac users: As of late October 2016, the Skype for Business client is available for macOS and OS X. ISC has conducted limited testing with the Skype for Business for Mac client, and has found it to function properly. ISC will continue testing to learn more about its features, user interface, and/or limitations. LSPs may want to remind their users that Skype is also available from within the web portal as an alternative.
The Skype for Business for Mac client, as well as installation instructions, may be found here:
https://www.microsoft.com/en-us/download/details.aspx?id=54108
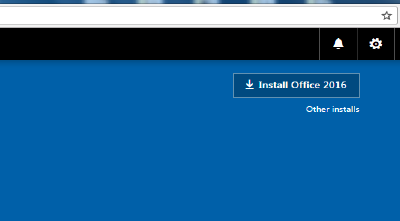
1. After signing in to Office 365 you will be presented with a home page that contains all of the application icons. In the upper right corner a link is available titled Other installs.
Click the link.
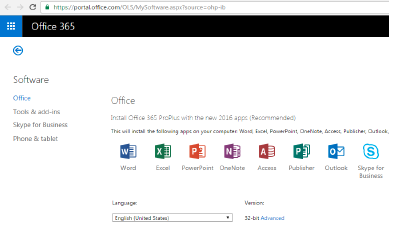
2. The next page will offer a list of choices on the left under Software. Click on the choice labeled Skype for Business.
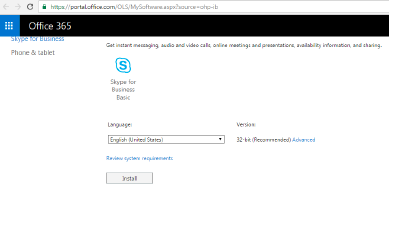
3. The next page offers the Install button as shown here.
Click on the Install button.
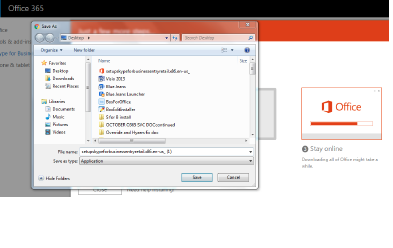
4. Similar to other types of installation routines, a dialogue box requesting a location to save your download will be presented.
Choose a location that will be easy to retrieve the file.
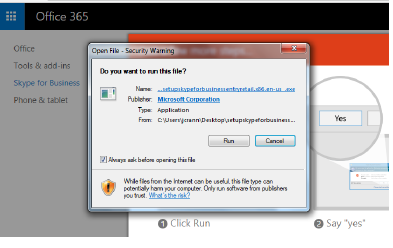
5. As in the case of a routine application download, a dialogue box offering Run is presented. Clicking on Run will set up the application.
Note: You must be assigned local admin permissions to run the file. You will contact your local support team if you do not have the admin role permission.
Outlook on the web (formerly Outlook Web Access or OWA) is available when you launch the Mail application icon from your Office 365 application menu.
Once inside Outlook, you can find the Skype icon on the upper right side near the silhouette, gear and bell icons.
Click on the Skype icon and you will see a menu appear underneath the icons. The Magnifying Glass offers Search, the Book icon offers access to Contacts and the Plus Sign begins a new Chat or Instant Messaging. The small circle with check mark on the silhouette indicates status, in this case Green indicates “Available”
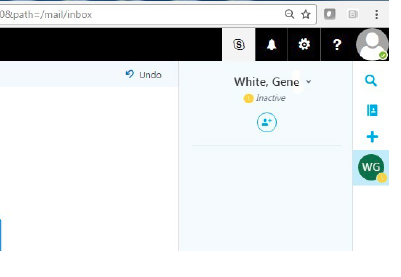
Click on the silhouette icon and a menu appears. You can choose to indicate your status and additional choices are available to sign off and terminate Instant messaging.
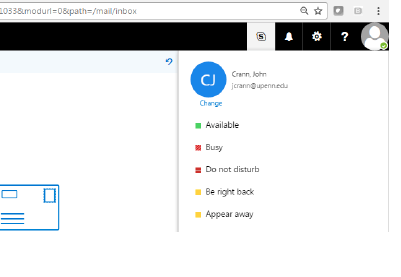
Inside the O365 portal, Outlook Web Access offers an icon (S) on the upper right side of your page next to the Notifications (Bell) icon.
A rollout menu will appear offering Search, Contacts List and Start New Chat icons.
Green (Available), Yellow (Last Seen), Red (Busy) circles appear next to the contact’s name and picture.
Clicking on the New Chat icon brings up a cursor that prompts the entry of a contact name.
A check mark at the bottom of the screen needs to be clicked to confirm your choice, then it offers a blinking cursor to enter text.
You will find the most comprehensive library of articles about getting around in Skype at: https://support.skype.com/en/skype/windows-desktop/start/find-your-way
In the upper right corner of Outlook Web Access, Click on the silhouette icon. A list of status choices is presented. You can also sign out of IM and Skype from here.
Skype for Business Online in Office 365 offers comprehensive support for Admins at https://support.office.com/en-us/skype-for-business
Skype for Business offers quick start guides for users at https://docs.com/OfficeTraining/9869/skype-for-business-quick-start-guides
Explore topics about getting started with Skype at https://support.skype.com/en/skype/windows-desktop/start/